Tiger Patch Embroidery Design
First Impressions: Sweet, Sturdy, and Instantly Recognizable
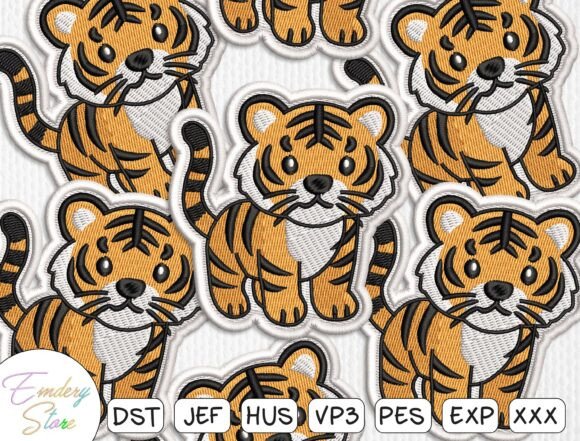
Opening the Tiger Patch Embroidery Design file feels like unboxing a well-considered sketch — not just a cartoon tiger, but a character. The baby tiger is round-faced, soft-eyed, with bold but friendly stripes and a gentle tilt to its head. It’s not overly detailed, which is smart: this isn’t a photorealistic portrait — it’s a machine embroidery design built for clarity at small-to-medium scales. The layout is compact and balanced, with no awkward limbs or thin protrusions that might snag during stitching or wear. Right away, I knew this would translate cleanly onto a custom embroidered tote bag for a local nursery boutique — sturdy enough for daily use, charming enough to stop shoppers mid-aisle.
Where It Shines: Real Projects, Real Customers
I tested Tiger Patch Embroidery Design across three real-world items: a cotton twill apron for a café pop-up, a 100% cotton baby onesie, and a woven polyester patch sewn onto a denim jacket. On the apron, the satin-stitched outline held crisp definition against the textured fabric — no bleeding or puffing. On the onesie, the fill stitch density felt just right: dense enough to prevent show-through on light fabric, but breathable enough for delicate skin. And as a patch? It stitched cleanly, trimmed easily, and looked polished even before backing — a huge time-saver for Etsy sellers batching holiday orders.
This design naturally fits custom apparel, personalized gifts, and small shop product lines where warmth and approachability matter. Think baby embroidery for milestone blankets, sweatshirt embroidery for preschool fundraisers, or holiday embroidery on tea towels for craft fairs. It reads clearly at 3.5–4 inches wide — ideal for chest placements, pocket accents, or center-front embroidery on toddler hoodies. As a digital embroidery file, it supports brand consistency without demanding technical gymnastics from the user.
Where to Pause — Not a Flaw, Just a Fit Check
Tiger Patch Embroidery Design isn’t meant for micro-embroidery. Avoid hooping it below 3 inches — the stripe detail starts to blur, and the eye loses definition. On stretchy fabrics like jersey or ribbed knits, use a medium-weight cutaway stabilizer and consider slightly reducing stitch density if your machine allows; otherwise, test first on scrap. Dark fabric works beautifully — the contrast makes those playful stripes pop — but avoid pairing light thread on black fleece without testing: some fill areas can look slightly translucent if the fabric nap is heavy.
Curved surfaces (like cap fronts) need extra attention: the design’s rounded shape adapts well, but I recommend floating a tear-away stabilizer underneath and slowing the machine speed by 10–15% for the final satin border. Also, skip placing it near seams or darts on fitted garments — the tiger’s body sits best on flat, stable fabric planes. It’s not an applique design, so don’t expect raw-edge texture or layered fabric effects — this is a clean, self-contained machine embroidery design.
What It Adds to Your Finished Product
It elevates perceived value without overcomplicating execution. Customers notice — and comment on — the friendliness of the expression, the confidence in the line work, the balance between simplicity and personality. That matters for handmade presentation and buyer engagement. A customer buying a personalized gift isn’t just paying for stitches; they’re investing in emotional resonance. Tiger Patch Embroidery Design delivers that quietly, reliably.
For craft business owners, it strengthens trust: consistent, professional results mean fewer returns, smoother Etsy listings, and repeat buyers who recognize your style. For commercial embroidery shops, it’s a low-risk, high-appeal addition to seasonal catalogs — especially around baby showers, zoo-themed birthdays, or spring collections. And because it avoids trendy gimmicks (no glitter threads, no fragile French knots), it stays fresh across seasons.
Designer Notes You’ll Actually Use
- Always test on scrap fabric first — especially with new thread brands or stabilizer combos. What looks sharp on screen may soften on linen or shift on terry cloth.
- Check thread color contrast early: try the tiger in navy on cream, charcoal on oat, or olive on ivory — then preview in grayscale to confirm readability.
- Review stitch density visually: zoom in on the stripe edges and inner ear. If fill areas look overly dense or sparse, adjust tension or stabilizer weight — not the file itself.
- Confirm hoop size compatibility: this design likely fits standard 4×4 hoops comfortably, but verify before hooping expensive fabric.
- Inspect small details: the tiger’s nose and inner ear are subtle — make sure they’re fully digitized and won’t vanish at smaller sizes.
- Test in black-and-white mockups: helps spot contrast issues before stitching.
- Use proper stabilizer: medium cutaway for knits, tear-away for stable wovens, and fusible + tear-away for lightweight cottons.
- Confirm licensing: if selling finished products or bundling as design assets, double-check usage rights — especially for resale or digital product previews.
Final Thought: A Reliable, Human-Centered Design Asset
Tiger Patch Embroidery Design doesn’t shout. It invites. It’s the kind of embroidery file you keep in your “go-to” folder — not because it’s flashy, but because it solves problems: it stitches cleanly, reads warmly, sells consistently, and holds up through washing, wear, and time. Whether you’re prepping a batch of embroidered pillow covers for a boutique launch or personalizing a holiday gift for a new parent, this design earns its place in your workflow. It’s proof that thoughtful digitizing — not just cute illustration — makes the difference between a nice idea and a finished product people love to hold, wear, and share.